
Chicken soop

|
Chicken soop
|

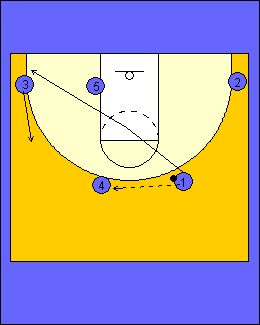
As the ball is brough up over half court, #5 moves up the lane and back screens for #4. The first option of this play is to look for #4 cutting down and across the lane for the layup. |
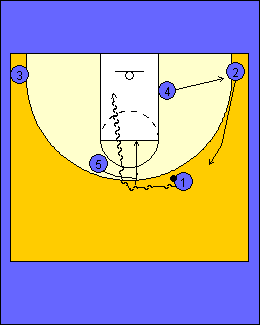
If #4 is not open, #5 steps out and ball screens for #1 at the top of the key area. #4 clears out to the corner and #2 slides up to the wing area. #1 "turns the corner" off the ball screen from #5 and tries to get to the basket. #5 waits for two dribbles past the screen and then either rolls to the basket or "picks and pops" out if he can shoot the "3". |
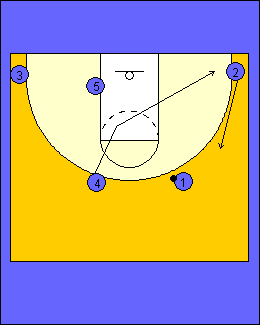
In this set, #4 cuts through the lane and out to the ball side corner area. #2 recognizes this action and slides up to the ball side wing area. |
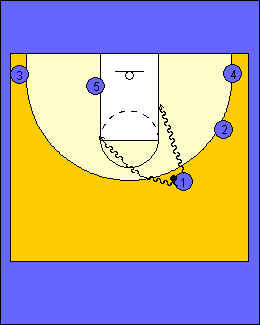
#1 now has the option to drive the ball down the right or left lane area. |
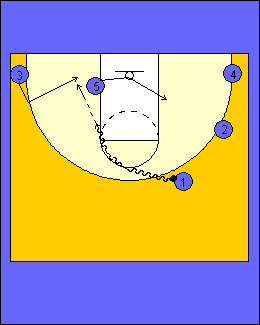
If he drives right he will look to score or kick out to any of the perimeter shooters. If he drives to the left, #5 will clear out and up a bit while #3 sets his man up a few steps and then cuts back door looking for the pass from #1 and then layup. |

Another option is for #3 to stay in the corner while #5 clears across looking for the dump off pass from #1 if #5's defender comes over to help. If #3's defender helps, #1 will kick out to #3. Of course the option for #1 to take the ball to the basket to score is ALWAYS the #1 option. |
#1 passes across the top to #4 and then cuts to the ball side corner area. #3 recognizes and slides up to the wing spot. |
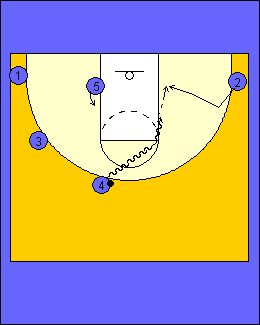
Now #4 has the same options as before. He can look to drive the right side of the lane line while #2 sets his man up and cuts back door for the pass and layup. #5 starts to slide up a bit as this action is taking place. |
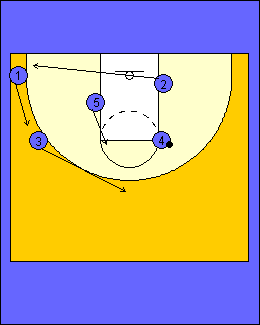
If #2 does not get the ball, #5 continues his cut up to the opposite elbow area. #2 clears out to the opposite corner while #3 and #1 slide up and over to keep proper spacing. |

#4 passes to #5 on the left elbow and then clears out to the opposite corner. Again, keeping proper spacing rules, #2, #1 and #3 slide up and over accordingly. #5 now looks to drive off the cutting back of #4 for the layup on the right side of the rim. |
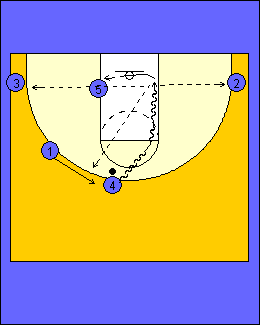
To back up a few steps in this play now, #4 may drive the ball himself looking to get to the basket while #2 stays in the corner. Now #4 looks to get to the basket or draw help from either #5 or #2's defender....or score himself. If he draws help, the dump off pass to #5 will be available or the kick out pass to either perimeter player will also be available. |
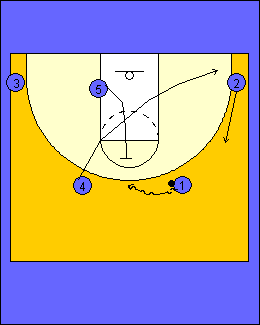
On this play, #4 clears out to the ball side corner area while #2 slides up to the wing. #5 is then following right behind #4's cut and setting a "flat" screen for #1 in the middle of the top of the key area. |
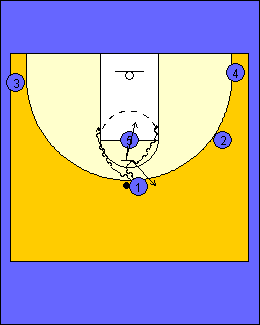
After #1 centers the ball, he can either drive right or left around #5's flat screen, depending on how he is being defended. #5 can either roll to the basket after a two dribble count or "pick and pop" out if he has the shooting range. |
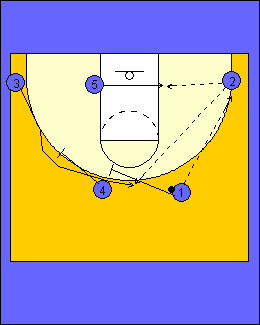
This is a standard play that most teams will run in transition to get shooters open. Here we see how the double staggered screen for shooters are developed out of the Dribble Motion Offense set. If you are looking to get #3 a shot, #1 passes to #2 in the right corner. #5 follows the ball across looking to post up. #1 and #4 set a double staggered screen for the shooter, #3, coming to the top. |
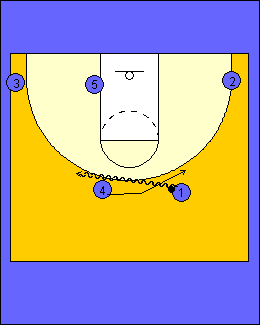
If you are looking to get #2 a shot, #1 drives the ball across the top while #4 cuts behind and takes his place. |

#1 now passes to #3 in the left corner. #5 stays and looks to post up. #1 and #4 set a double staggered screen for the shooter, #2, coming to the top. |
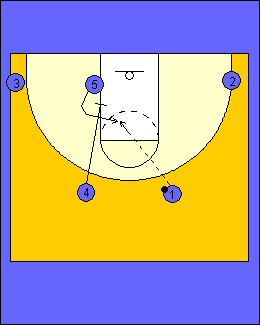
This is a quick hitting play, as all of these are, with the #4 man running the floor and down into the lane to set a screen for #5. #5 cuts over the top of the screen looking for the pass from #1 and the mid-lane jump shot. |
|
Created with Basketball Playbook from Jes-Soft
|